
SELECT YOUR PHOTO WALL BELOW FOR INSTRUCTIONS
PHOTO WALL STICKER
SEE STICKER INSTRUCTIONS
1. PREPARE THE WALL
Choose your Surface: Photo Wall Stickers will stick to most clean flat surfaces and even some textured surfaces. For freshly painted walls allow a 3 week drying period.
Clean Wall: Before applying your Photo Wall Stickers, you should make sure the surface is clean and dust free.
2. ON THE WALL
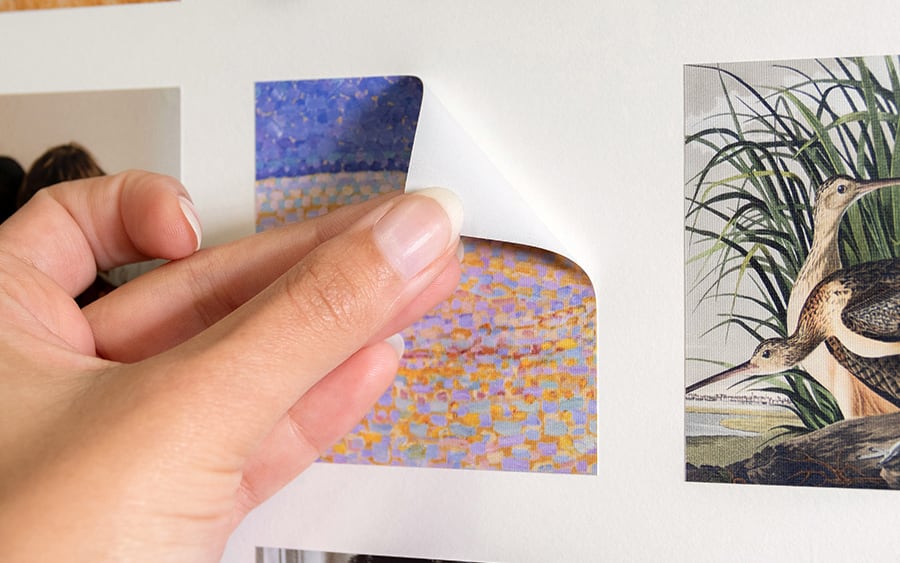
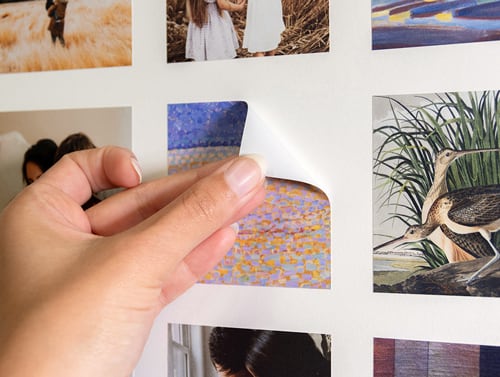
Stick Them Up: To transform that boring blank wall, start by planning and designing your layout. Carefully peel the Stickers off the backing paper and stick onto the wall.
Gently Rub Sticker: Gently rub over the surface of the Sticker with a soft cloth or the back of your hand from the centre outwards, pushing out any air bubbles.
Watch the short video below for Photo Spacer Instructions. Applies to both Photo Wall Stickers & Tiles.
3. OFF THE WALL
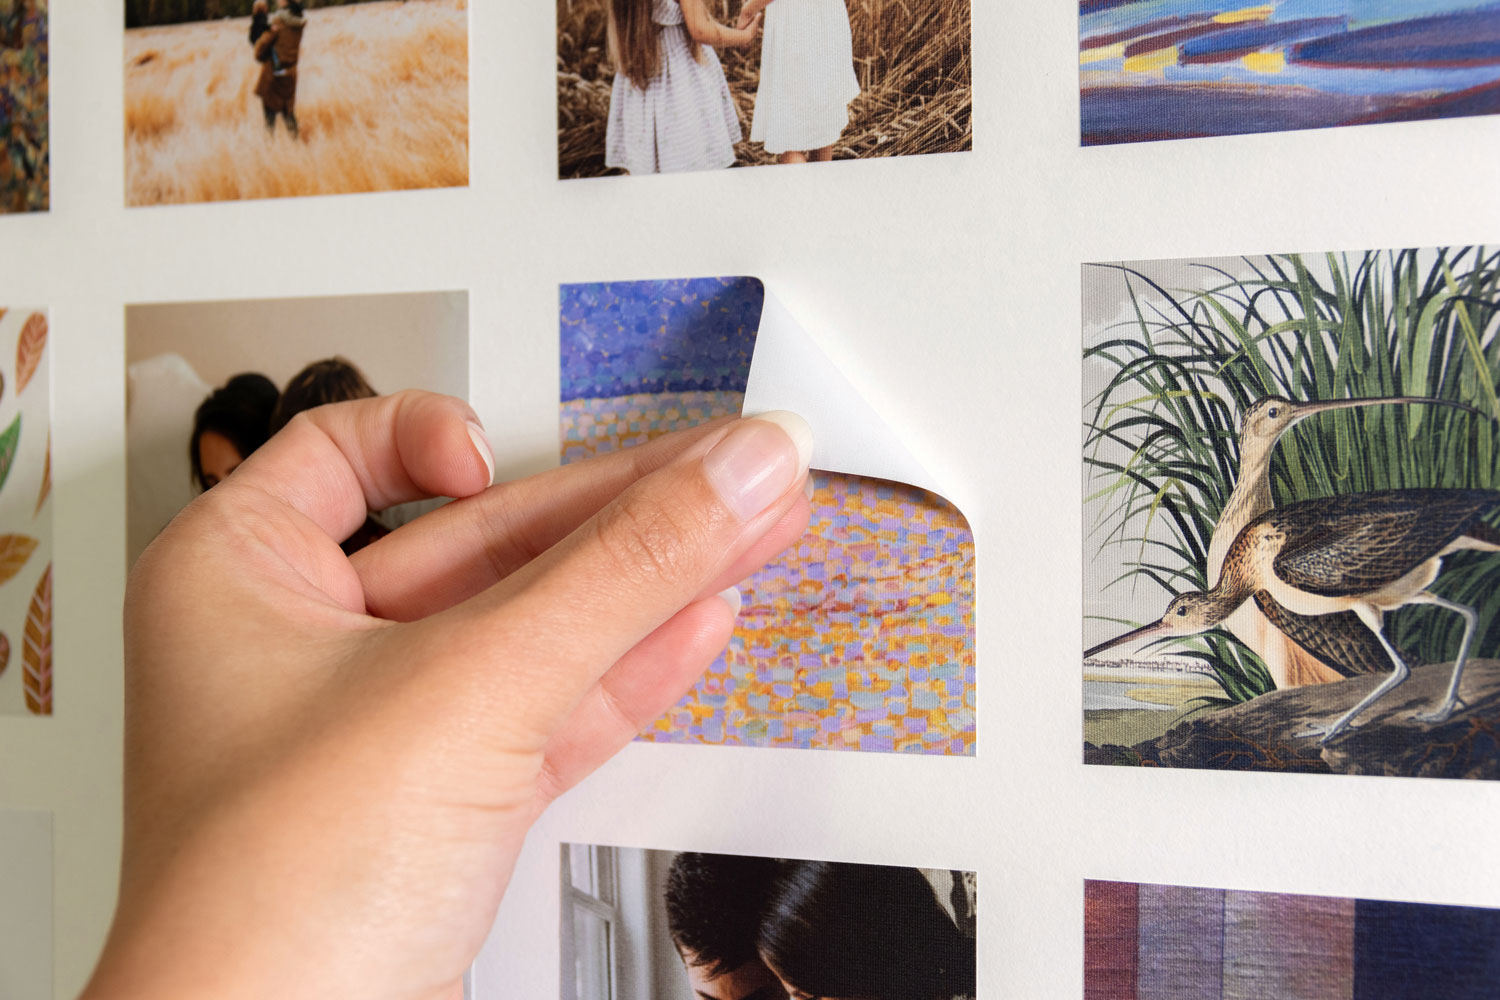
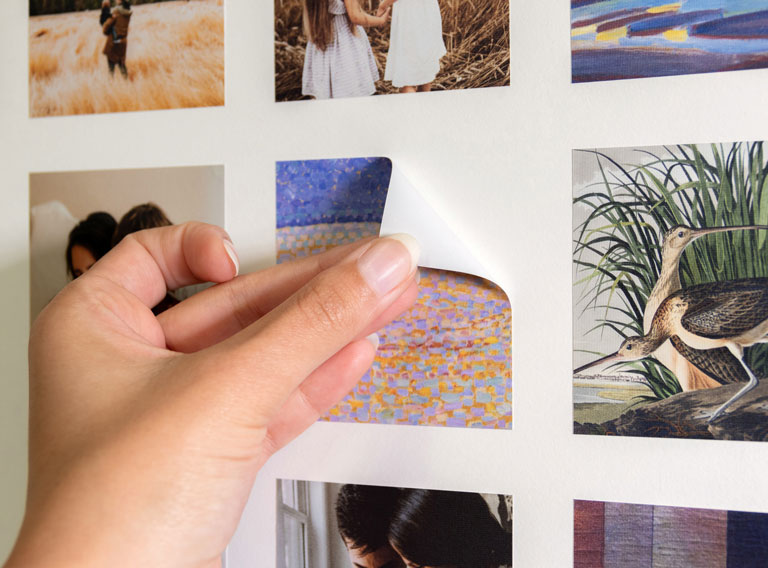
To Take Them Down: To remove, carefully lift a corner and whilst folding the sticker back on itself, slowly peel off. Our Photo Wall Stickers shouldn't damage your wall, but it's important to be careful when removing in case the wall has been poorly prepared before painting. If you are concerned, or if the wall offers resistance, heat with a hairdryer while removing. The backing paper is a good place to store your Photo Wall Stickers.
Warning: Photo Wall Stickers are designed for decoration only and are not to be considered as a toy. Please ensure that they are out of reach of children under 3 years of age, especially children in a cot, crib or bed to avoid a possible choking hazard.
PHOTO WALL - WOODEN & ACRYLIC TILES
SEE TILE INSTRUCTIONS
1. PREPARE THE WALL
Choose your Surface: Photo Wall Tiles love clean, flat surfaces (gyprock, plaster, painted timber). They can handle some texture, but flat is best.
Note: For freshly painted walls, please allow a 3-week drying period before applying.
Clean it Up: Dust is the enemy of stickiness! Give your wall a quick wipe down with a dry cloth to ensure it is clean and dust-free.
2. ON THE WALL
Plan your Layout: Before you stick, plan your design! (Tip: Lay them out on the floor first).
Applying the Sticky tabs:
Take the provided foam tape and peel off one side of the liner.
Apply the tape to the marked squares on the back of the tile. Press firmly to ensure the tape bonds to the tile.
For Wood Tiles: Apply to the top two marked squares.
For Acrylic Tiles: Apply to all four marked squares (top and bottom).
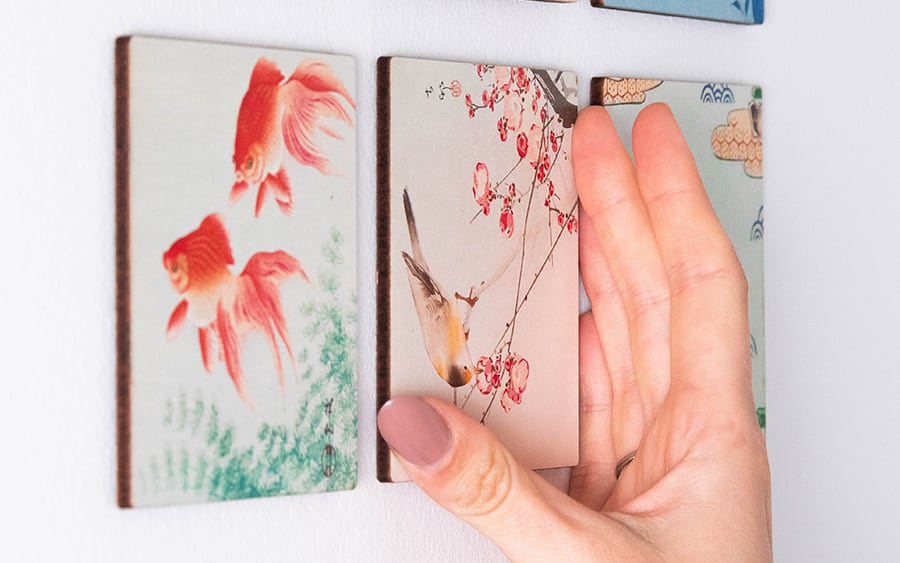
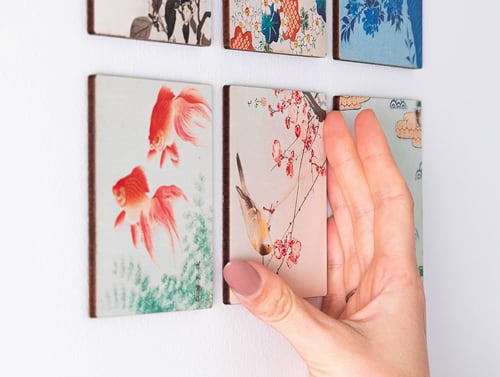
Stick to your Wall:
Remove the remaining liner from the foam tape on the back.
Position the tile on the wall and press firmly for 5 seconds directly over the areas where the tape is (corners).
Watch the short video below for Photo Spacer Instructions. Applies to both Photo Wall Stickers & Tiles.
3. OFF THE WALL (CRITICAL STEP)
Speed is the enemy! To avoid wall damage, you must let the adhesive release slowly.
For Wood Tiles (Top Adhesive Only):
Simply lift the bottom edge and peel the tile upwards towards the ceiling very, very slowly.
For Acrylic Tiles (4-Corner Adhesive):
Since these stick at all 4 corners, do not pull straight off!
Release the Bottom: Gently grip the bottom corners (there is a small gap behind the tile) and ease them away from the wall until the bottom pads pop free.
Peel Upwards: Once the bottom is loose, peel the rest of the tile upwards slowly.
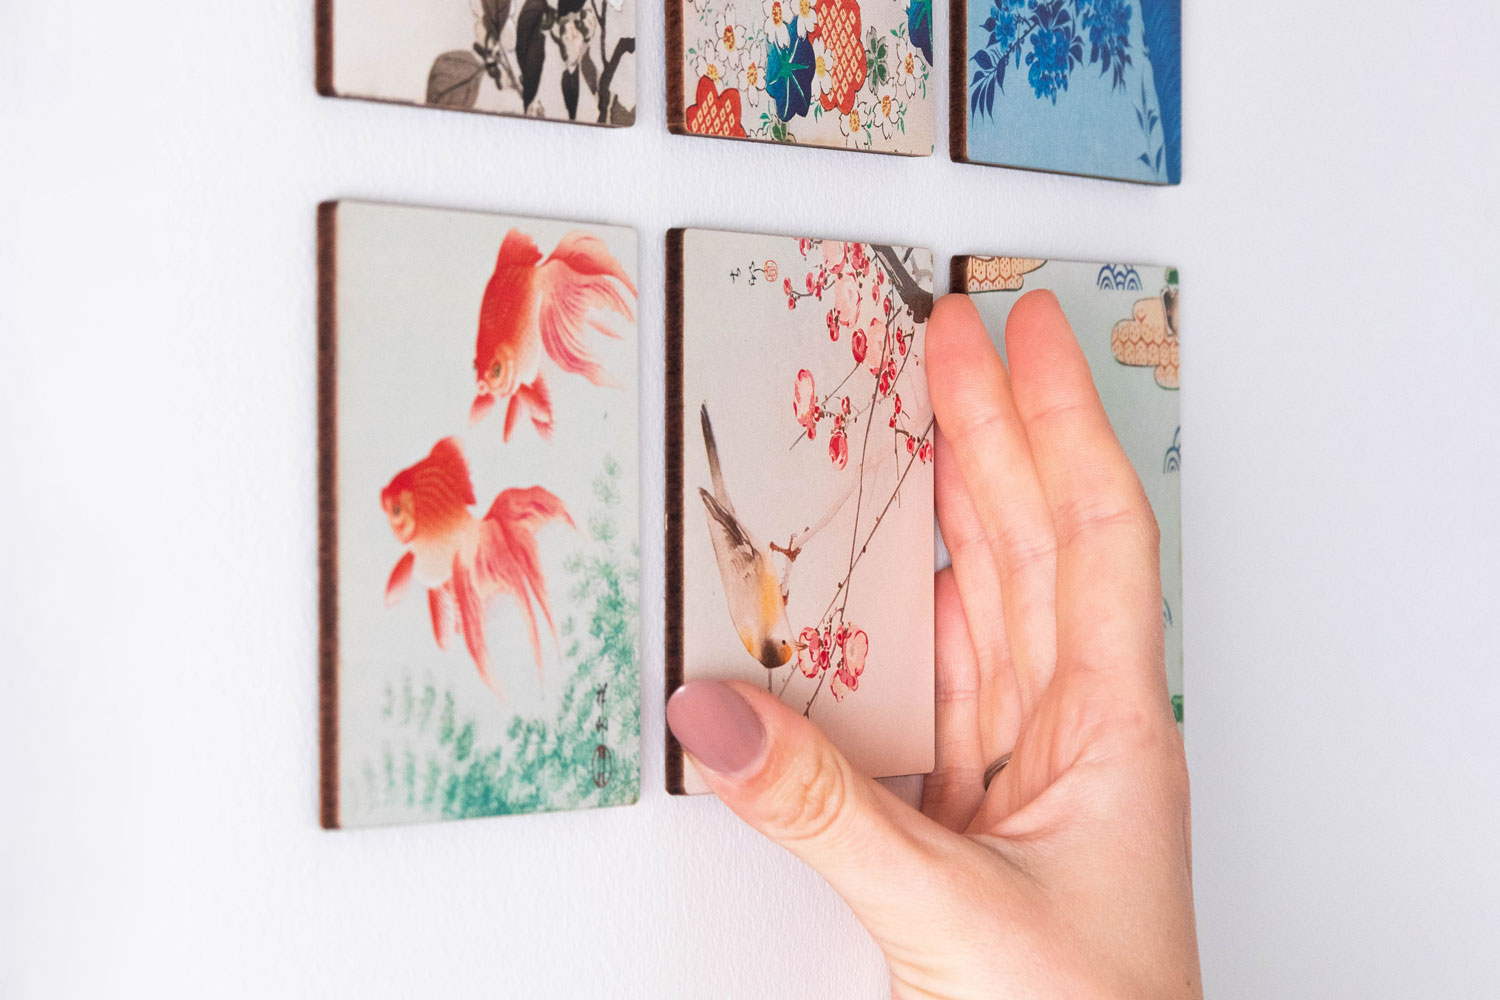
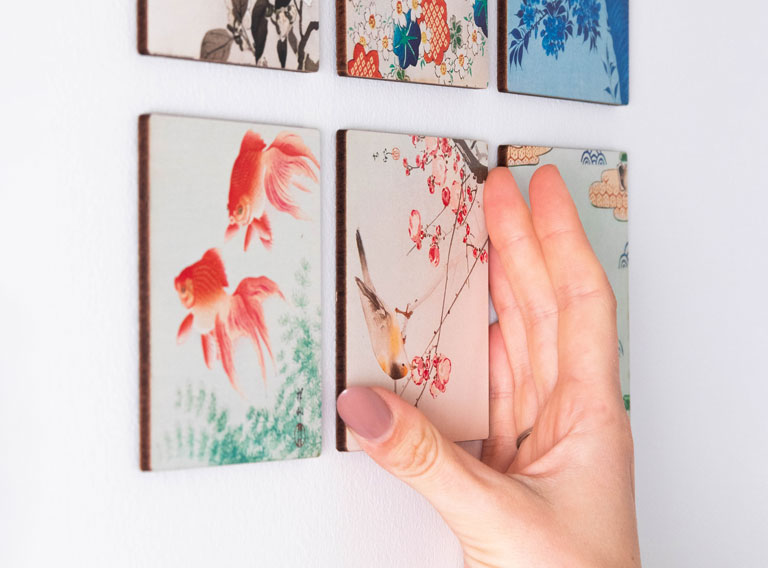
To Take Them Down: If you prepare your wall correctly & remove tiles the right way you won't damage your wall. To correctly remove your Photo Wall Tiles, lift the bottom edge away from the wall SLOWLY. Pulling off quickly may damage your wall.
Warning: Photo Wall Tiles are designed for decoration only and are not to be considered as a toy. Please ensure that they are out of reach of children under 3 years of age, especially children in a cot, crib or bed to avoid a possible choking hazard.
1. PREPARE THE WALL
Choose your Surface: Photo Wall Tiles will stick to most clean flat surfaces and even some textured surfaces. For freshly painted walls allow a 3 week drying period.
Clean Wall: Before applying your Photo Wall Tiles, you should make sure the surface is clean and dust free.
2. ON THE WALL
Plan your Layout: To transform that boring blank wall, start by planning and designing your layout.
Applying the Sticky tabs: Using the provided tape, cut the sticky foam tape to the correct size according to the cut guide markings. Remove one side of the foam tape liner and apply the foam tape to the small squares on the back of the Photo Wall Tile. Press firmly to ensure that the foam tape is stuck to the tile properly.
For Acrylic tiles, you can leave the protective film on the front of the tile while you do this.
(For Acrylic Tiles) Remove the Protective Layers: Before sticking the tile to the wall, peel off the protective film from the front of the acrylic tile.
Stick to your Wall: Carefully peel off the protective film, position Photo Wall Tile on wall and press firmly for a few seconds where the sticky tabs are.
Watch the short video below for Photo Spacer Instructions. Applies to both Photo Wall Stickers & Tiles.
3. OFF THE WALL
To Take Them Down: If you prepare your wall correctly & remove tiles the right way you won't damage your wall. To correctly remove your Photo Wall Tiles, lift the bottom edge away from the wall SLOWLY. Pulling off quickly may damage your wall.
Warning: Photo Wall Tiles are designed for decoration only and are not to be considered as a toy. Please ensure that they are out of reach of children under 3 years of age, especially children in a cot, crib or bed to avoid a possible choking hazard.
SELECT YOUR PHOTO WALL BELOW
OPTION 1: STICKERS >>
STEP-BY-STEP. Click To Reveal...
+ PREPARE THE WALL
Choose your Surface: Photo Wall decals will stick to most clean flat surfaces and even some textured surfaces. For freshly painted walls allow a 3 week drying period.
Clean Wall: Before applying your Photo Wall decals, you should make sure the surface is clean and dust free.
+ ON THE WALL
Stick Them Up: To transform that boring blank wall, start by planning and designing your layout. Carefully peel the decals off the backing paper and stick onto the wall.
Gently Rub Sticker: Gently rub over the surface of the sticker with a soft cloth or the back of your hand from the centre outwards, pushing out any air bubbles.
Watch the short video below for Photo Spacer Instructions. Applies to both Photo Wall Stickers & Tiles.
+ OFF THE WALL
To Take Them Down: To remove, carefully lift a corner and whilst folding the sticker back on itself, slowly peel off. Our Photo Wall decals shouldn't damage your wall, but it's important to be careful when removing in case the wall has been poorly prepared before painting. If you are concerned, or if the wall offers resistance, heat with a hairdryer while removing. The backing paper is a good place to store your Photo Wall decals.
Warning: Photo Wall decals are designed for decoration only and are not to be considered as a toy. Please ensure that they are out of reach of children under 3 years of age, especially children in a cot, crib or bed to avoid a possible choking hazard.
OPTION 2: TILES >>
STEP-BY-STEP. Click To Reveal...
+ PREPARE THE WALL
Choose your Surface: Photo Wall Tiles will stick to most clean flat surfaces and even some textured surfaces. For freshly painted walls allow a 3 week drying period.
Clean Wall: Before applying your Photo Wall Tiles, you should make sure the surface is clean and dust free.
+ ON THE WALL
Stick Them Up: To transform that boring blank wall, start by planning and designing your layout. Carefully peel off the foam tape liner, position Photo Wall Tile on wall and press firmly for a few seconds where the sticky tabs are.
Watch the short video below for Photo Spacer Instructions. Applies to both Photo Wall Stickers & Tiles.
+ OFF THE WALL
To Take Them Down: If you prepare your wall correctly & remove tiles the right way you won't damage your wall. To correctly remove your photo tiles, lift the bottom edge away from the wall SLOWLY. Pulling off quickly may damage your wall.
Warning: Photo Wall Tiles are designed for decoration only and are not to be considered as a toy. Please ensure that they are out of reach of children under 3 years of age, especially children in a cot, crib or bed to avoid a possible choking hazard.
OPTION 1: STICKERS >>
STEP-BY-STEP. Click To Reveal...
+ PREPARE THE WALL
Choose your Surface: Photo Wall decals will stick to most clean flat surfaces and even some textured surfaces. For freshly painted walls allow a 3 week drying period.
Clean Wall: Before applying your Photo Wall decals, you should make sure the surface is clean and dust free.
+ ON THE WALL
Stick Them Up: To transform that boring blank wall, start by planning and designing your layout. Carefully peel the decals off the backing paper and stick onto the wall.
Gently Rub Sticker: Gently rub over the surface of the sticker with a soft cloth or the back of your hand from the centre outwards, pushing out any air bubbles.
Watch the short video below for Photo Spacer Instructions. Applies to both Photo Wall Stickers & Tiles.
+ OFF THE WALL
To Take Them Down: To remove, carefully lift a corner and whilst folding the sticker back on itself, slowly peel off. Our Photo Wall decals shouldn't damage your wall, but it's important to be careful when removing in case the wall has been poorly prepared before painting. If you are concerned, or if the wall offers resistance, heat with a hairdryer while removing. The backing paper is a good place to store your Photo Wall decals.
Warning: Photo Wall decals are designed for decoration only and are not to be considered as a toy. Please ensure that they are out of reach of children under 3 years of age, especially children in a cot, crib or bed to avoid a possible choking hazard.
OPTION 2: TILES >>
STEP-BY-STEP. Click To Reveal...
+ PREPARE THE WALL
Choose your Surface: Photo Wall Tiles will stick to most clean flat surfaces and even some textured surfaces. For freshly painted walls allow a 3 week drying period.
Clean Wall: Before applying your Photo Wall Tiles, you should make sure the surface is clean and dust free.
+ ON THE WALL
Stick Them Up: To transform that boring blank wall, start by planning and designing your layout. Carefully peel off the foam tape liner, position Photo Wall Tile on wall and press firmly for a few seconds where the sticky tabs are.
Watch the short video below for Photo Spacer Instructions. Applies to both Photo Wall Stickers & Tiles.
+ OFF THE WALL
To Take Them Down: If you prepare your wall correctly & remove tiles the right way you won't damage your wall. To correctly remove your photo tiles, lift the bottom edge away from the wall SLOWLY. Pulling off quickly may damage your wall.
Warning: Photo Wall Tiles are designed for decoration only and are not to be considered as a toy. Please ensure that they are out of reach of children under 3 years of age, especially children in a cot, crib or bed to avoid a possible choking hazard.
OPTION 1: STICKERS >>
STEP-BY-STEP. Click To Reveal...
+ PREPARE THE WALL
Choose your Surface: Photo Wall decals will stick to most clean flat surfaces and even some textured surfaces. For freshly painted walls allow a 3 week drying period.
Clean Wall: Before applying your Photo Wall decals, you should make sure the surface is clean and dust free.
+ ON THE WALL
Stick Them Up: To transform that boring blank wall, start by planning and designing your layout. Carefully peel the decals off the backing paper and stick onto the wall.
Gently Rub Sticker: Gently rub over the surface of the sticker with a soft cloth or the back of your hand from the centre outwards, pushing out any air bubbles.
Watch the short video below for Photo Spacer Instructions. Applies to both Photo Wall Stickers & Tiles.
+ OFF THE WALL
To Take Them Down: To remove, carefully lift a corner and whilst folding the sticker back on itself, slowly peel off. Our Photo Wall decals shouldn't damage your wall, but it's important to be careful when removing in case the wall has been poorly prepared before painting. If you are concerned, or if the wall offers resistance, heat with a hairdryer while removing. The backing paper is a good place to store your Photo Wall decals.
Warning: Photo Wall decals are designed for decoration only and are not to be considered as a toy. Please ensure that they are out of reach of children under 3 years of age, especially children in a cot, crib or bed to avoid a possible choking hazard.
OPTION 2: TILES >>
STEP-BY-STEP. Click To Reveal...
+ PREPARE THE WALL
Choose your Surface: Photo Wall Tiles will stick to most clean flat surfaces and even some textured surfaces. For freshly painted walls allow a 3 week drying period.
Clean Wall: Before applying your Photo Wall Tiles, you should make sure the surface is clean and dust free.
+ ON THE WALL
Stick Them Up: To transform that boring blank wall, start by planning and designing your layout. Carefully peel off the foam tape liner, position Photo Wall Tile on wall and press firmly for a few seconds where the sticky tabs are.
Watch the short video below for Photo Spacer Instructions. Applies to both Photo Wall Stickers & Tiles.
+ OFF THE WALL
To Take Them Down: If you prepare your wall correctly & remove tiles the right way you won't damage your wall. To correctly remove your photo tiles, lift the bottom edge away from the wall SLOWLY. Pulling off quickly may damage your wall.
Warning: Photo Wall Tiles are designed for decoration only and are not to be considered as a toy. Please ensure that they are out of reach of children under 3 years of age, especially children in a cot, crib or bed to avoid a possible choking hazard.
OPTION 1: STICKERS >>
STEP-BY-STEP. Click To Reveal...
+ PREPARE THE WALL
Choose your Surface: Photo Wall decals will stick to most clean flat surfaces and even some textured surfaces. For freshly painted walls allow a 3 week drying period.
Clean Wall: Before applying your Photo Wall decals, you should make sure the surface is clean and dust free.
+ ON THE WALL
Stick Them Up: To transform that boring blank wall, start by planning and designing your layout. Carefully peel the decals off the backing paper and stick onto the wall.
Gently Rub Sticker: Gently rub over the surface of the sticker with a soft cloth or the back of your hand from the centre outwards, pushing out any air bubbles.
Watch the short video below for Photo Spacer Instructions. Applies to both Photo Wall Stickers & Tiles.
+ OFF THE WALL
To Take Them Down: To remove, carefully lift a corner and whilst folding the sticker back on itself, slowly peel off. Our Photo Wall decals shouldn't damage your wall, but it's important to be careful when removing in case the wall has been poorly prepared before painting. If you are concerned, or if the wall offers resistance, heat with a hairdryer while removing. The backing paper is a good place to store your Photo Wall decals.
Warning: Photo Wall decals are designed for decoration only and are not to be considered as a toy. Please ensure that they are out of reach of children under 3 years of age, especially children in a cot, crib or bed to avoid a possible choking hazard.
OPTION 2: TILES >>
STEP-BY-STEP. Click To Reveal...
+ PREPARE THE WALL
Choose your Surface: Photo Wall Tiles will stick to most clean flat surfaces and even some textured surfaces. For freshly painted walls allow a 3 week drying period.
Clean Wall: Before applying your Photo Wall Tiles, you should make sure the surface is clean and dust free.
+ ON THE WALL
Stick Them Up: To transform that boring blank wall, start by planning and designing your layout. Carefully peel off the foam tape liner, position Photo Wall Tile on wall and press firmly for a few seconds where the sticky tabs are.
Watch the short video below for Photo Spacer Instructions. Applies to both Photo Wall Stickers & Tiles.
+ OFF THE WALL
To Take Them Down: If you prepare your wall correctly & remove tiles the right way you won't damage your wall. To correctly remove your photo tiles, lift the bottom edge away from the wall SLOWLY. Pulling off quickly may damage your wall.
Warning: Photo Wall Tiles are designed for decoration only and are not to be considered as a toy. Please ensure that they are out of reach of children under 3 years of age, especially children in a cot, crib or bed to avoid a possible choking hazard.
15% off Bentos & Bottles:
ROS
Home/Offers Banner
Category/Subcategory Banner
T&Cs (AU only as a sample. T&Cs blocks for other countries will be created after sign off)
Login and Registration Form